
Key Takeaways:
- Convertible tops are primarily made of canvas or vinyl, each with distinct advantages: canvas offers durability and breathability, while vinyl is cost-effective with good UV protection.
- Choosing between glass and plastic windows depends on clarity, weight, and installation convenience; glass is sturdier but heavier, while plastic is easier to replace but more prone to scratches.
- Weather resistance is a key consideration; canvas is breathable for humidity, and vinyl resists UV rays but can crack in extreme temperatures.
- Essential tools for removing a convertible top include screwdrivers, a ratchet set, pliers, a utility knife, and potentially specialty tools like a staple gun and heat gun.
- Documenting the removal process with photos can aid in a smoother reinstallation of the new top.
- Aligning and tensioning the new convertible top correctly ensures a snug fit and prevents flapping during driving.
- Applying high-quality seam sealant during install helps protect against water infiltration and prolongs top durability.
- Regular cleaning with appropriate products is crucial; canvas tops require gentle cleaners while vinyl tops benefit from UV protectants.
- Seasonal care involves inspections and preventive measures tailored to summer and winter conditions to maintain top integrity.
- Promptly addressing small damages can prevent costlier repairs and maintain the overall appearance and value of the convertible.
Understanding Your Convertible Top: Types and Materials
Unveiling the Classic Canvas vs. Modern Vinyl
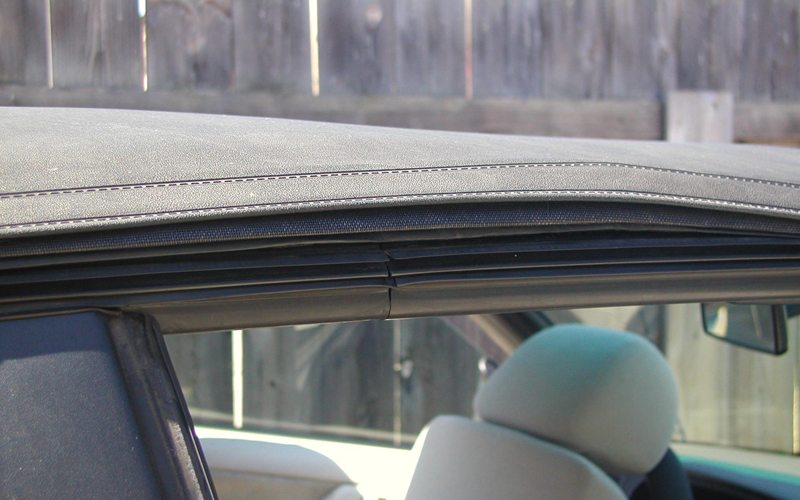
Convertible tops have evolved significantly over the years, with two predominant materials being canvas and vinyl. Canvas, often viewed as the classic choice, boasts outstanding durability and a timeless aesthetic. Typically made from cotton or synthetic blends coated with waterproofing agents, canvas tops allow for breathability, which is essential for avoiding mold and mildew in humid conditions. Furthermore, canvas tops are often easier to repair and have a higher resistance to tears and punctures, making them an excellent long-term investment.
On the other hand, vinyl has gained popularity in more modern convertibles due to its lower cost and maintenance requirements. Vinyl tops are known for their excellent water resistance and UV protection, ensuring that your car’s interior remains intact despite prolonged sun exposure. However, vinyl can be prone to cracking over time, especially in extreme temperatures, which may necessitate earlier replacement. Additionally, while vinyl can offer a sleek and polished look, it lacks the traditional appeal and layered texture of classic canvas tops.
Ultimately, when deciding between canvas and vinyl, consider factors such as your climate, your vehicle’s aesthetic, and your willingness to invest in long-term durability versus short-term affordability. By understanding these distinctions, one can make a more informed choice suited to individual needs.
Choosing Between Glass and Plastic Windows: Pros and Cons
The windows of your convertible can significantly influence the overall functionality and aesthetic appeal of the top. Generally, convertible tops come with either glass or plastic windows, each with its unique advantages and disadvantages. Glass windows are favored for their clarity, scratch resistance, and superior insulation properties; they tend to offer a quieter ride by effectively reducing road noise and enhancing the overall comfort within the vehicle. Additionally, glass windows provide a level of security not achievable with plastic windows, deterring thieves and safeguarding your interior from the elements.
However, glass windows can introduce complexities during installation and replacement. They are typically heavier than their plastic counterparts, which can impact the performance of the convertible mechanism over time. Moreover, should a glass window shatter, repair can be costlier and more involved than replacing a plastic window. In contrast, plastic windows are lighter and generally easier to replace, making them a popular choice for DIY enthusiasts. They can be found in various tints and shades, affording a customizable look for your vehicle.
Nevertheless, the downside to plastic windows stems from their susceptibility to scratches, yellowness over time, and overall fragility in comparison to glass. As with any decision regarding convertible tops, weighing the pros and cons of each option within the context of your specific needs and preferences is crucial to ensuring satisfaction in the long run.
How Weather Resistance Influences Material Choices
When selecting materials for your convertible top, it’s imperative to consider how well each material can withstand varying weather conditions. Rain, snow, and intense sunlight can wreak havoc on your car’s exterior and interior, making it essential to choose a top that offers optimal weather resistance. Canvas materials typically have a natural breathability that allows most moisture to escape without causing mildew or mold to accumulate. Furthermore, many modern canvas tops are treated with waterproofing solutions, enhancing their ability to repel water and resist the environmental effects that come from rain and snow.
Conversely, vinyl tops excel in providing a barrier against elements such as UV rays and moisture. Their waterproof nature protects the contents of your car from getting wet, while UV protection minimizes the risk of sun damage and discoloration. However, the rigid nature of vinyl can lead to cracking and peeling when subjected to extreme temperatures. Consequently, if you live in a region characterized by seasonal extremes, it’s essential to consider factors like thermal stability when making your material decision.
Ultimately, the choice of convertible top material should align with the climate conditions in your area and the level of exposure your vehicle faces. A thorough understanding of the weather-related properties of each material will not only ensure the longevity of your top but also enhance your driving experience.
The Art and Science of Removing Your Old Convertible Top
Tools You’ll Need: From Screwdrivers to Specialty Equipment
The process of removing a convertible top requires specific tools and equipment to ensure a smooth and successful task. First and foremost, you’ll need a set of screwdrivers, including both Phillips and flat-head variations, to help remove various screws that secure the top. A ratchet set can come in handy for unscrewing bolts. Additionally, pliers may be necessary to detach components like trims and clips that might not easily give way. A utility knife should also be on your list, as it can be used to cut away old material from the frame, if necessary.
Beyond these basics, it’s advisable to have a trim removal tool, which prevents potential damage to your car while extracting plastic panels or trim. Depending on the make and model of your convertible, you may also require specialty tools such as a staple gun to re-affix the new top or a heat gun for easier removal of adhered materials. Lastly, an impact wrench can significantly speed up the process if you face stubborn bolts that refuse to engage. Ensuring you have all the right tools for the job will not only save you time but also help you avoid unnecessary frustrations during the removal process.
Step-by-Step Guide: A Comprehensive Walkthrough
The removal process for an old convertible top involves careful steps to avoid damaging the vehicle or the framework holding the top. Start by carefully reviewing your vehicle’s manual, which may provide specific instructions for your model. Begin by removing any soft top frame components, including storage compartments and bolts. As you detach these pieces, always keep screws and bolts organized to ensure you can easily locate them during reinstallation.
Once the frame is disassembled, focus on taking off the old top itself. If it is secured with staples or adhesive, carefully use your utility knife to peel away the material without damaging the frame beneath. If you encounter difficulty, applying heat with a heat gun can help soften adhesives, making removal easier. As you work through the layers, ensure you take constant breaks to assess your progress and can avoid accidentally undermining the structure of the convertible.
After the top is free, inspect the underlying frame for any signs of rust or damage. Addressing these issues before installing the new top is crucial to ensuring a long-lasting installation. Once the area is clean and ready, you can proceed to the next stage—the installation of your new convertible top.
Avoiding Common Pitfalls: Tips from Experienced DIYers
Removing an old convertible top can be a daunting task; however, there are several tips from seasoned DIY aficionados that can help avoid common mistakes and pitfalls. First and foremost, make sure you schedule ample time for the job—underestimating the time required can lead to rushed decisions that result in errors. It’s also wise to have a helping hand; an extra set of hands can be invaluable in safely maneuvering and holding the top, especially during the removal and installation phases.
Another crucial point to remember is to document every step with photographs. Capturing the state of how the old top is installed, including the positioning of various components, can serve as a valuable reference during reinstallation. In addition, keep all fasteners and components organized so that you don’t end up missing vital pieces when putting everything back together.
Lastly, always take your time when removing the old top and do not overexert yourself. Forcing components can lead to damage in both the top and the car. Instead, prioritize a methodical, patient approach, and if you encounter difficulties, don’t hesitate to reach out to online forums or experts for guidance. By embracing a cautious and methodical strategy, you can successfully overcome potential obstacles during the removal process.
Installing Your New Convertible Top: Techniques for Success
Aligning and Tensioning: Achieving the Perfect Fit
Once the old convertible top has been removed, installing the new one as part of a convertible top replacement requires precision and attention to detail. Begin by properly aligning the fabric with the frame, ensuring that all edges are straight and that it fits snugly across the entirety of the top’s surface. It helps to have the top laid out under the sun for a while before installation; the heat can make the material more pliable, allowing for better adjustment. Begin by securing the edges of the fabric to the frame using clips or temporary fastening devices, which will help hold the top in place as you proceed with the installation.
Tensioning is another critical aspect of the installation process. A well-tensioned convertible top not only looks aesthetically pleasing but also ensures that it does not flap or create wind noise while driving. As you pull the top into position, periodically check both the sides and the rear to ensure uniform tension. Applying too much tension in one area can cause distortions or lead to premature wear, so a balanced approach is essential. In general, methods such as moving from the center outward while tightening will yield the most consistent results.
Sealing Techniques: Keeping the Elements at Bay
To ensure your new convertible top stands the test of time against unfavorable weather conditions, applying effective sealing techniques during installation is vital. This is typically done at the seams, where the fabric meets the frame. Start by choosing a high-quality seam sealer specifically designed for your top material, and carefully apply the sealer along each seam using a caulking gun. Pay attention to critical areas, such as corners and the front seam where the top meets the windshield, as these areas are susceptible to water infiltration, which can lead to mold and degradation.
Once you’ve applied sealant, take the time to create smooth lines without excess buildup that might mar your top’s appearance. Allow adequate curing time for the sealer before exposing the top to moisture, as this step is crucial for solidifying your investment. Additionally, consider reapplying the sealant periodically as a part of your top’s maintenance routine to prolong its life and effectiveness.
Quality Check: How to Ensure a Flawless Installation
After completing the installation, it’s essential to conduct a thorough quality check to verify that everything has been set up correctly. Start by inspecting alignment and straightness; ensuring that the fabric lays flat without any bubbles or warps is critical. After checking for visual consistency, perform a hands-on assessment by gently tugging on various sections of the top to examine the tension. Listen for any unusual sounds that might signify unsecured edges or flapping that could occur while driving.
Evaluate the closure mechanisms as well; ensuring that zippers and clasps function smoothly without obstruction can enhance usability and security. Test the mobility of the top itself if your model is designed for manual opening and closing—any resistance can indicate that realignment is necessary. Finally, if applicable, don’t forget to check the windows for clarity and sealing, as any leaks from poorly installed glass or plastic can compromise your driving experience.
Maintenance Tips to Extend the Life of Your Convertible Top
Cleaning Techniques: Products That Won’t Ruin Your Top
Proper maintenance is essential to prolong the life of your convertible top, and the first step in this process is regular cleaning. It is vital to use materials designed specifically for your top’s fabric. For canvas tops, use a gentle, non-bleach cleaner combined with warm water, scrubbing with a soft bristle brush to avoid damaging the fibers. Rinse thoroughly to ensure no residue remains, as leftover cleaner can accelerate degradation. Additionally, consider using a dedicated fabric protector post-cleaning to help repel dirt and moisture.
For vinyl tops, a vinyl cleaner can be beneficial to remove dust and grime without causing damage. Avoid harsh chemicals and solvents, as these can strip the vinyl of its protective properties, leading to cracks or deterioration. A soft cloth or sponge will allow you to polish the surface without scratches. Regular application of a UV protectant formulated for vinyl can also help preserve its appearance and prevent fading from sun exposure.
Seasonal Care: Preparing for Summer and Winter
Seasonal changes put unique stressors on convertible tops, meaning that proper care for each season is essential. For the summer months, ensure that your top is clean and free from debris to promote airflow and prevent mold. Using a sunshade when parked can also save your top from excessive heat, minimizing fading and material fatigue. In addition, consider regular waxing for vinyl tops to enhance UV resistance—this step can help maintain the color vibrancy and overall appearance of your convertible.
As winter approaches, prepare your convertible top for the cold by inspecting for any cracks or areas that may need sealing. Additionally, ensure that your windows are in good condition, as functionally clear windows are vital for safety. If you live in a region with harsh winter conditions, gently brush off snow accumulation to prevent any physical damage or undue weight on the top. Storing your convertible in a garage or using a protective cover can also shield it from winter elements, reducing the risk of damage from ice and snow buildup.
Spotting and Repairing Damage Early: Save Time and Money
One of the best ways to extend the life of your convertible top is by promptly addressing any signs of damage. Regularly inspect your top for small tears, punctures, or wear that may introduce larger problems if left unchecked. For minor damages, specific repair kits designed for canvas and vinyl tops allow for easy emergency fixes. Understand that although these surface repairs seem minor, they can significantly prevent water intrusion and long-term damage, ultimately saving you money on costly replacements.
Additionally, watch for signs of wear around areas where parts come into contact, such as seams or edges. A stressed seam can easily rip due to the strain of movement, and addressing it early could involve simple reinforcement rather than a full replacement. Investing time in preventive measures not only keeps your convertible looking its best but allows you to maintain the aesthetic and value of your vehicle for years to come.
FAQ
Question: How often should I replace my convertible top? – The frequency of replacement depends on factors such as material durability, weather conditions, and usage patterns. Generally, high-quality tops last anywhere from 5 to 10 years.
Question: Can I install a convertible top myself? – Yes, many DIY enthusiasts successfully install their convertible tops. However, it requires patience, the right tools, and following detailed instructions carefully to ensure proper fit and finish.
Question: What should I do if my convertible top is leaking? – If you notice leaks, inspect the seams and closures for damage or wear. Applying seam sealer and ensuring proper alignment can often solve the issue. If problems persist, consider consulting a professional.
Question: Are there additional protective measures I can take for my convertible top? – Yes, using a protective cover when not in use, applying UV protectants regularly, and parking in the shade can help extend the life of your convertible top.
Question: How do I properly clean a vinyl convertible top? – Clean vinyl tops using a gentle vinyl cleaner and a soft cloth or sponge. Avoid harsh chemicals, and consider applying a UV protectant to preserve color and prevent cracking.
Question: What are signs that my convertible top needs repair? – Look for visible damage such as tears, fraying, or discoloration. If you notice leaks during rain or increased wind noise while driving, these could indicate that repairs are necessary.
Question: Can I use a regular car cover for my convertible? – It’s best to use a cover specifically designed for convertibles to ensure a proper fit and to allow for breathability, preventing moisture buildup that can cause mold and mildew.
Question: What is the best weather condition for installing a convertible top? – Ideally, install a convertible top on a dry, sunny day. Warmer temperatures can make the materials more pliable, facilitating easier installation and adjustment.